Banner recipe

I made a banner for MrC’s birthday. I’ve seen several versions of banners all over the crafty and noncrafty web, and I was hooked. But I wasn’t hooked enough to sew a fabric banner. Here is my version of the newspaper and craft paper banner:

Start with a pile of newspapers and pretty craft papers. I made a triangular template (not shown) to trace on the paper.

From October08

I used scissors to cut out the paper because I was too lazy to change the blade in the rotary cutters (I have blades for fabric and blades for paper)… a craft knife would work as well. Put the template on the fold of the newspaper to make a diamond shape when it’s unfolded. Cut out enough for your banner message (I used on diamond per letter).

From October08

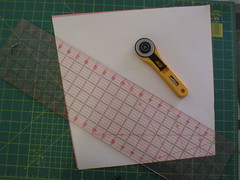
At some point, change your mind about the design because you don’t have enough colorful paper to finish the project. Instead of using the colorful craft paper, use plain white paper instead. Use your template to cut out triangles (you don’t need diamonds for this step).

From October08

Glue the triangles to one half of your newspaper diamond.

From October08

Break out some colorful markers, and write your message in bold print.

From October08

Find some twine long enough for your message… attach it to the wall, or the curtain rods, or the roof… wherever you want that message to be displayed.  The folded diamond slips over the twine and hangs by itself.

From October08

Wait patiently for hours and hours for the recipient of your message to come home and read it… and be AMAZED you have that much time to make banners and homemade-out-of-this-world cupcakes (sorry, no pics of the cupcakes… but they were GOOD!).

From October08

I don’t have a picture to show but BC and I wrote birthday messages on extra triangles. We nudged the letters together to make room for them. I think that was a better idea than the original banner message. MrC plans to save his notes.

Bag Tutorial – alternate top seam method

In my last bag tutorial (Gusseted Tote Bag Tutorial parts 1-5), I used the pillowcase method to attach the bag’s lining to the shell. I don’t usually use the pillowcase method. This is strictly a preference thing. So, if you like the pillowcase method and are happy with your results, keep using it. If you want to try something new, or maybe you don’t like the top of your bags, try this next method.

I am now presenting to you the “Cathy is a perfectionist and the pillowcase method ruffles her feathers” method, aka the “CIAPATPMRHF” method. I won’t lie to you, this method is like it’s name… it takes longer and is a little more labor intensive than the pillowcase method.

Step 18A (the “A” means it is the alternative method): Place the liner inside the shell with wrong sides facing.

Step 19A: Start folding down the edge of the shell and the edge of the liner (fold the shell to the inside, fold the liner to the outside… this way the folds are facing each other).

Fold the lining so that it is set slightly lower than the shell. This gives the top of your bag a clean edge.

When you pin the lining to the shell, make sure that the side seams of both line up. What I usually do is fold down the shell first, then line up the side seams. Then I go all the way around pinning the lining to the shell.

Step 20A: Lay the bag flat. This way you can make sure that the opening is even.

This picture shows how the lining is lower than the shell.

Step 21A: In this step, I sewed the lining into the bag without the handles in place.

This particular lining fabric was so slippery, I could hardly keep it pinned in place. If you are using a cotton lining, you can sew the lining and handles at the same time. See step 22A for placement of the handles if you are sewing them with the lining.

I like to sew with the lining up because I can see exactly where it is.

Step 22A: Mark the center of the bag with pins. Then measure out to where the insides of the handles will be.

If you sewed all the way around the bag like I have shown, you have to rip open the seam to place the handles. More precise sewers would have left small openings for the handles. I’m not that precise and I love my seam ripper.

You will want to open the seam slightly wider than the width of the handles.

Step 23A: Slide the handles into the openings. Pin into place. Make sure the handles are the same length by holding them next to each other.

Sew the handles into place.

Go back to the Gusseted Bag Tutorial for hard bottom instructions.

Voila, you are done! Sit back and enjoy your bag.

Gusseted Tote Bag tutorial…part 5

Your bag is almost complete! And it looks fantastic, doesn’t it? There are only a couple of things that we can add to finish it: a hard bottom and a closure. Neither of which you are required to do… you can take your bag now and call it done!

flower bag

Step 25: Give your gusseted bag form with a hard bottom.

Measure the depth and length of your bottom seams.

Hard bottom
Hard bottom

Step 26: Find a source of cardboard. Cut out two rectangles using the dimensions from Step 25.

Hard bottom
Hard bottom

Step 27: Paste the two pieces together.

Hard bottom

Step 28: Cut out two pieces of fabric to cover the cardboard piece. Sew these two pieces, right sides together. Leave one side open. Turn this sleeve right side out. Slip your cardboard bottom piece into the sleeve. Close the open end.

sew rectangle
bottom sleeve
(This is an example of the ever useful pillowcase method!)

Step 29: Glue the bottom piece into the bottom of the lining. I usually use hot glue.

hard bottom
There are other ways to attach the bottom piece to the lining. I have sewn a tube into the bottom seam and then slipped the cardboard into the tube. I have velcroed it to the bottom. I’m sure there are other ways to do it that I haven’t explored yet. Also, you don’t have to use cardboard, you can use heavy cardstock, plastic, wood, metal, or plexiglass… use whatever you have on hand that you can get into the required shape and dimensions. You can even buy premade hard bottom pieces.

Step 30: Closure…

Most of my bags have a button and loop closure. You sew a button onto the shell on one side of the bag, and a matching loop on the other side of the bag.

stripes out
stripes in

I have sewed them on many different ways but I almost always sew them on last… which means that you will see the knots inside the bag. I like to think it gives the bag a little more character… I am also lazy. You can make it look cleaner by sewing the button and loop onto the shell before you sew on the top seam. If you want magnetic closures, sew them onto the lining before you sew the top seam.

Closure indeed! That’s it for the Gusseted Bag Tutorial Series. I hope it has been helpful!

***********

Mel B. left a great comment on Part 4 about another method she has learned… “You leave an opening at the bottom of the liner. Place the lining and shell together like you have, but before you put the the lining in, you place the handles inside the shell and pin the ends at the top of the bag (some excess overhangs)–then put the lining over them (into the shell)…top stitch around the top…then pull the shell and handles through.”

Yes, this is another great method. I forgot to mention in Part 4 that before you sew the shell to the lining, you can insert the handles between the two layers, with the handles going down toward the bottom of the bag and the ends at the top seam, and sew them on as you sew the top seam. You can do this whether you leave the hole in the bottom of the lining or leave it in the top seam. This is another very good pillowcase method, and the pillowcase method is generally awesome. You should definitely learn how to do this method because it is useful in so many applications.

Please let me know if you have any questions!

Gusseted Tote Bag tutorial…part 4

Where are we?

Shell, check. Liner with pockets, check. Handles, check. Good! Since we have all those pieces ready, let’s put the bag together.

I hope the elves are on duty because I’m about to tell you how to put the bag together using my least favorite method. This is the method you see in most tutorials, and it works beautifullly… so master it! Then, grasshopper, you can move onto the “Cathy is a perfectionist and the pillowcase method ruffles her feathers” method. The “CIAPATPMRHF” method is going to be another mini-tutorial at a later date.

FYI: I am making all the pictures public so you can click on them.

Step 18: Place the liner inside the shell so that the right sides of each are facing.

Attach liner to shell
The picture makes so much more sense than the words.

Step 19: Sew the top of the liner and shell together. Leave a 4-inch opening on one side.

Attach liner to shell
You could also leave openings for the handles at this step.

Step 20: Reach inside the 4-inch opening. Grab a corner of the shell and pull it through the opening. This is going to turn the bag out so that only the right sides show.

Opening logic
Shell and lining attached
It’s like magic, and you didn’t even need the elves.

Step 21: Push the liner back inside the shell.

Push lining into shell
That was a nice and easy step, probably the last easy one!

Step 22: Determine where you want to insert the handles.

Marking handle location
Placing handles
I like the handles to be about 4-5 inches apart. Measure how wide your bag is, divide that number in half… this gives you the center point (my center pin is round yellow). Put a pin in the bag to locate the center. Now locate the handle insertion points. If your handles are 4″ apart, then put a pin 2″ to the right of the center pin, and 2″ to the left of the center pin (my pins are round white). These pins locate the inside edge of the handles. Make sure you mark both sides of the bag with pins. Use a seam ripper to open up the seam where you want to place the handles… make an opening slightly wider than your handles.

Did you notice I have more pins in the bag than I said you need for the handles? Those pins are optional.

I don’t like how this method of bag construction puts the seam between the liner and the shell at the very top of the bag. I want the seam to be behind the shell so I roll the seam down just a bit to the inside of the bag… the flat flower pins are holding the seam in place. If you don’t mind the seam being on top, you don’t have to roll it down.

Step 23: Insert the handles into the openings. The handles’ seams should face the inside of the bag. Pin in place.

Placing handles
The hardest part of this step is making sure you don’t twist the handles before inserting the other side.

Step 24: Make sure all your raw edges are tucked inside for a hem. Top stitch all around the bag.

Picture for Step 24: Imagine perfect top stitching around the top of the bag…

Your bag is now 95% complete. And it is so very wrinkled… ick!!! Go, use a medium hot iron to press it. Avoid melting the ribbon, and don’t use too much heat or the fusible interfacing will remelt and pucker. That is potential disaster after all your hard work.

Sit back and admire your work!

To be continued….

Gusseted Tote Bag tutorial…part 3

You now have a completed shell and a completed liner with interior pockets. It’s time to make handles!

Step 15: Cut your handle fabric and padding material.

The length should include 2 times the desired drop (distance from top of handle to top of bag) plus 2 inches to go over the shoulder plus 2 inches for handle insertion. My bag has an 8-inch drop so the length of the fabric is: 8″ + 8″ + 2″ + 2″ = 20″.

The width of the cut fabric will be about 3 times the desired width of the handle: 1.25″ + 1.25″ + 1.25″ = 3.75″. The width of the padding material will be just a shade less than the width of the handle (shade = less than 1/16″).

Handle materials
For padding material in this project, I chose fleece interfacing. You can use whatever is available. I have used quilt batting, fleece interfacing, fleece, and nothing. Padding is not only more comfortable but it also keeps the handles from pinching to a rope.

Step 16: Place padding material on the wrong side of the fabric, slightly to one side of center. Wrap the short side over the padding, pin into place. Wrap the long side over and fold under a hem. Pin this into place so that the fold is about 1/8″ to 1/4″ from the side of the handle.

Contructing handleContructing handleContructing handle

Step 17: Sew down the fold. Then sew the other side of the handle the same distance from the edge as you sewed down the fold.

Handle
Do Step 17 twice so that you have two handles… or close your eyes and let the elves do it. Either way this is a “sit back and admire your work” step!

To be continued…

Gusseted Tote Bag tutorial…part 2

Okay, now you have a completed shell and the liner is cut out. Time to get going again.

Step 7: Gussets. That word used to put a chill up my spine but they really are easy once you done a couple.

Pinch together a corner of the bag… thumb on the side seam and index finger on the bottom seam (or put your thumb on the bottom seam and your index finger on the side seam, either way works!). You want these two seams to line up together. Then measure half your bag depth from the tip of the corner up along the seam, leave a mark. Then pin that corner down. Sew across the seam from one side to the other.

Sewing gussets
This bag is 3 inches deep so my mark was 1.5 inches up the seam from the tip.

Step 8: Check the seam. I usually turn the bag out to check that the seams didn’t move while I was sewing (if they do, I rip out the sewing and try again). Some people chop these corners off with 1/4 to 1/2-inch seam allowance. If you decide to chop them off, reinforce the gusset seam by sewing across it again. Don’t chop off the corner until you are sure it is straight!

Gussets
If you look closely, you can see that my seams are off here. I ripped it out to line them up … I get particular that way.

Step 9: Do the other gusset, sit your shell up and admire your work.

Gusset logic
This is why I do gussets… so I can sit back and admire my work (just kidding!… ummm… hehe, sort of… look at that bag sitting there by itself!). This midpoint perk motivates me to keep going. If you get bogged down in future steps, remember Step 9!

Step 10: Enough patting yourself on the back already! Now we have some drudgery meticulous work to complete. Set your shell aside and grab some fabric. You are going to make the interior pockets. Cut out a rectangle that goes all the way across the bag and is about 6 to 7 inches deep. Sew a hem across what will be the top of the pocket.

Picture for Step 10: Close your eyes, imagine helpful elves cutting a rectangle. Don’t open your eyes until the hem is sewn!

Step 11: Now that the elves are done, grab one side of your liner. Measure on the right side (as opposed to the wrong side not the left side) to where you want the bottom of the pocket to land.

I like the bottom of this type of pocket to be at the bottom of the bag. Add half the depth of the bag to the bag’s seam allowance and the pocket’s seam allowance (my bag is 3″ deep… 1.5″ + 0.5″ + 0.5″= 2.5″). Line the bottom of the pocket fabric to these marks, right sides facing. Sew down.

Measure pocket positionAttaching pocket

Step 12: Flip that pocket fabric up so that it is in pocket position.

Fold over pocket

Step 13: Top stitch across the bottom of the pocket (1/4 to 1/2 inch). Sew in your pockets. Lock the stitches at the top of the pocket… for me that means sew forward, sew backward, sew forward, sew backward, all over a 1/2″ length… you might have a function on your sewing machine that knows how to do this (I have GOT to get a new machine already!).

Completed pockets
I also lock the stitches on the bottom of the pocket. On this type of pocket, you don’t have to sew the other side of the outer pockets because they will be sewn into the lining’s seam allowance. I used to sew them down but I have gained a lot of confidence since then.

Step 14: Sew the liner together, right sides facing.

Finished liner
Admire your pockets!

To be continued…

Gusseted Tote Bag tutorial…part 1

I wanted to show you one of the ways I make gusseted bags (gussets = flat bottom). Some of the steps are always the same, some of the steps can be tweaked. First, I will start with a basic tutorial, and then I will either explain the tweaks verbally or add another mini-tutorial later. Please try to ignore the quality of the photographs… it was really hard to control the light with my usual household chaos.

Let me know if anything is confusing or too vague.

Step 1: Develop the pattern. This is my basic bag pattern… a trapezoid. This pattern is 3 inches wider at the top than at the bottom. The top of the bag is 15 inches.  I always cut the bag liners using this pattern, and I use it for one-piece shells (shell = outside of bag). Since this is a gusseted bag, I added the bag height and half the bag depth to get the top to bottom dimension of the pattern (this bag: 12″ high, 3″ deep… so the pattern is 12″ plus 1.5″ = 13.5″). Add a seam allowance all around.

Liner patternLiner patternLiner
Tools that make this job easy peasy: a sharp rotary cutter and a long rigid ruler.

Step 2: I usually make bags with a contrasting bottom using a second 2-part pattern for the shell. It is the same size as the one-piece pattern, except you need to add a seam allowance all around both pieces.

Shell patternShell pattern

Step 3: Pick a coordinating ribbon… my favorite step.

Picking ribbon

Step 4: Sew together the shell pieces.  Sew the seam allowance between fabrics down.

Sewing shellSew down seam allowance
Here you see me sewing the seam allowance on each side… it is better to sew both allowances down toward the bottom piece of the bag because it creates a small ridge that will hold the ribbon in place.

Step 5: Press the shell and iron on the fusible interfacing.

Iron on fusible lining
I used fusible fleece interfacing on this bag. You can choose the type of interfacing depending on how “hard” you want the shell to be. You can also use a sew-on interfacing if you don’t like the fumes from the fusible (yucky stuff).

Step 6: Sew the ribbon onto the shell where the two fabrics are joined. Sew the shell together with right sides facing.

Finished shell
You can sew the ribbon onto the shell before you add the interfacing. I line up the ribbon on the join of the fabrics so it lays on the top piece of the shell. If you sewed the both seam allowances to the bottom piece of the shell, there will be a small ridge that will hold the bottom of the ribbon on the join.

To be continued…