Current projects

I have had this pretty rose fabric for a while now.

[This photo doesn’t really show the colors very well. The rose fabric is pretty close but is prettier in person.  The solid fabric is a light yellow that coordinates with the background yellow of the rose fabric.]
I was looking for the “perfect” project for the rose fabric. It sat in the closet for a long time. I realized that there is no “perfect” project, and that any project was better than no project. I broke out my beginner quilting book and picked out a pattern.

There was one critical criteria for the pattern… I only had 1 yard of the rose fabric. I could have cut it up and used it in a scrap quilt but I really wanted to have something that showcased this fabric. I found a pattern, bought some coordinating fabric, and started chopping and sewing.


I didn’t get too far along before my back started screaming. I don’t have a very good set up for sewing. I sit at the dining room table on a dining room chair. The ergonomics are excruciating.

I tried adjusting the sewing machine height with yoga blocks.

It was better but my back still hurt.

After much research, I ended up putting the sewing machine back on the table. I put the yoga blocks under my feet and a lumber pillow behind me. Raising my feet and supporting my back was a 80% improvement. I think the final 20% will require tilting the sewing machine somehow and using an office chair. Also, better lighting would be lovely.

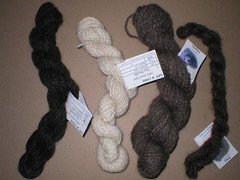
And, just in case you think I’ve forgotten how to knit, I started working on this:

I don’t know what “this” is going to end up being. Does anyone else ever knit for the sake of knitting? No pattern just knitting? I do have some ideas for it but it is definitely a “I love to knit for the sake of knitting” project.

The tote bag made me do it

I’m sneaking in… thank you all so much for your well wishes.  The cheesecake, both virtual and real, was fantastic.

I made a tote!   An old client requested it, and I didn’t want to disappoint her.  I already had the machine out for another project so I made the tote.  Here it is:

From September08

And the inside:

From September08

I’ve done some other projects too. If I can track down the pics (or take new ones), I will post them.

Bag versus bag… bag wins.

The weather this past Friday was awful… there were tornado and thunderstorm warnings all day. We spent the day inside… BC spent his time grousing about what was on tv while I groused (to myself) about grocery bags. Plastic grocery bags are wonderful and awful at the same time.  Wonderful because they are so thin and utile.  Awful because they are plastic and will never go away.  You’d think I would have already solved my personal grocery bag dilemma seeing as how I make tote bags and such. But, as I’ve mentioned before, I’m lazy. Being stuck inside all day with a ton of unfinished housework finally propelled me 3 feet across the office from computer to sewing machine.

My mission: an easy-to-make but strong grocery bag that MC and I will actually use. I had 2 basic patterns in mind: one based on plastic grocery bags, and one tote-bag style. An additional goal was to use stash fabric or recycled fabric.

Bag #1: This first design was based on plastic grocery bags. I took apart a plastic bag to make the pattern. I used a thrifted bed sheet as the fabric of choice.

(no, that is not my hairy arm in the picture!)

Results: Exactly like a plastic grocery bag… except that the handles are a bit cumbersome because fabric doesn’t squish down like plastic does. The recycled bed sheet was awesome except the color and pattern were too emasculating for any man to carry even with the best of green intentions.  At least that was my interpretation of MC’s reaction which went along the lines of “You made this one for me?! Couldn’t you use more macho colors??”

The pattern was also a pain in my neck (except it wasn’t my neck that was in pain, the pain was at the other end of my spine). Curves and single piece handles were awkward and required too much work for my peace of mind.

On to style number 2 (which I was hoping would not be number 2 like the first style).

Bag #2: This design is a tote bag… but different from the style of tote bags that I usually make.

Results: We have a winner (the man held the bag so it looks wonky but it lays perfectly flat). I modified the bag design because the original tote bag I based it on was made from heavier, unlined fabric. I used newly purchased fat quarters for this bag and some muslin from my stash. I didn’t have enough “manly” stash fabric, and Joann’s was having a sale, and BC was pitching a tantrum about something so I distracted him by asking him to pick some fat quarters for daddy. Whew! That was a mouthful… and then we went to the park for 2 hours where I managed to get a sunburn despite being bundled up because it was in the 50’s and the wind was blowing straight through my clothes and I was freezing, and why was I the only one there wearing something heavier than a sweatshirt including my family? Seriously.  They didn’t get a sunburn either.

Bottom line: This style was quick and easy to sew. The seams are strong. The material is strong because it is lined. The handles may be too short but I won’t know till the man actually uses them for groceries. I didn’t tell him about the handles because I didn’t want to influence his evaluation, and I don’t want to take the bag apart to put longer handles in (lazy, remember?). I did manage to use some of my stash… I can use more stash when I make bags for myself seeing as how I like feminine colors and patterns.  And wear sunblock if you are going to spend 2 hours at the park.

As you can see, I liked the pattern enough to duplicate it.

The colors are still “cute” according to the man but what do you expect when you let a 5yo pick them out after you stirred up a hornet’s nest of a temper tantrum… at least they aren’t emasculating pink flowers.

(BTW, BC insisted on putting back his original choice after MC said how much he liked the fabric… me thinks the boy wanted daddy to suffer.)

The house is still a mess… I’m thinking I need at least 10 of these bags!

Lambkin notes

I didn’t say much about making Lamb when I posted his/her (a little of both according to BC) pictures… too busy being lazy, I think.  The pattern is easy peasy with some caveats.  If you use flannel (or another loose weave fabric), you might want to apply interfacing on the backside.  Lamb’s stitches are pulling out in the most embarrassing places.  Also, if you are hand stitching, make it worth your while and use small, back stitches (or something similar).  Oh, and mark your seam allowance… trust me.  Learn from my exploits or you too will have a misshapen lambkin that is pulling seams and tearing its weave open.  Despite her idiosyncrasies, Lamb is much-loved.

Banff and Clutter … revisited

I finished the reconstruction of Banff. I added 3 inches of stockinette then reknit the 2×2 rib bottom. It fits! And it is so comfy and warm. I have been wearing since the cold blast of arctic weather arrived this week.

If you look at the middle of the reconstructed sweater (on the right), there is a horizontal line where I started the reknit. The line was not created by as a result of reconstruction. It was created by accidentally using US3’s instead of the larger size required.

I used the smaller circs to pick up the stitches before cutting, and then forgot to replace them with larger needles. If I wasn’t lazy, I would have unknit back to those stitches and started again. But I am lazy. And the lazy in me has decided that the stitches will loosen themselves up over time without my help. This yarn is so limp, it might work.

Pattern: Banff
Yarn: Noro Cotton Iroha (70% cotton, 20% cashmere, 10% nylon). Probably discontinued.  I have 5 skeins left in my stash.

Next up, a scarf:

The lace is a simple, 2-sided pattern: yo, k2tog, repeat.

I think the yarn in my stash is multiplying on its own. I keep knitting using this Sirdar yarn but the pile never seems to get smaller. I used all but one skein of navy to make this scarf.

Pattern: Openwork Scarf from Vogue Knitting Scarves Two (a big thanks goes to Kristen at AudioKnits for this book!)
Yarn: Sirdar Snuggly Aran (55% nylon, 45% acrylic)

And my clutter revisited. You all had great suggestions on how to handle clutter.  Thank you so much for your ideas.

I may have mislead you though… I do have storage. I have very little organization but I have storage. Like the smalled plastic drawers on wheels that Lisa, the Domestic Diva, suggested. I have other types of plastic drawers as well. By the way, if you need help reorganizing your craft space, definitely visit Lisa!

I also have shelves on the wall next to my sewing machine. Ribbons and fabric scraps are in ziploc bags. Larger pieces of fabric are folded and stacked (oh so carefully too). The green pillow on the bottom says something about cats at work, but the dog sleeps there.

I have more shelves behind me and across the room. The wire shelves hold my son’s toys (smaller toys are contained in baskets).

I still need to reorganize all these shelves.  I can never find what I need.

Currently, I have decided to keep the bag parts on a big board that I can pick up without disturbing the fabric. When I want to sew, I can move it temporarily.  After I put use this stash, I won’t be cutting out multiple bags parts again… only what I need for one bag at a time.

Bag Tutorial – alternate top seam method

In my last bag tutorial (Gusseted Tote Bag Tutorial parts 1-5), I used the pillowcase method to attach the bag’s lining to the shell. I don’t usually use the pillowcase method. This is strictly a preference thing. So, if you like the pillowcase method and are happy with your results, keep using it. If you want to try something new, or maybe you don’t like the top of your bags, try this next method.

I am now presenting to you the “Cathy is a perfectionist and the pillowcase method ruffles her feathers” method, aka the “CIAPATPMRHF” method. I won’t lie to you, this method is like it’s name… it takes longer and is a little more labor intensive than the pillowcase method.

Step 18A (the “A” means it is the alternative method): Place the liner inside the shell with wrong sides facing.

Step 19A: Start folding down the edge of the shell and the edge of the liner (fold the shell to the inside, fold the liner to the outside… this way the folds are facing each other).

Fold the lining so that it is set slightly lower than the shell. This gives the top of your bag a clean edge.

When you pin the lining to the shell, make sure that the side seams of both line up. What I usually do is fold down the shell first, then line up the side seams. Then I go all the way around pinning the lining to the shell.

Step 20A: Lay the bag flat. This way you can make sure that the opening is even.

This picture shows how the lining is lower than the shell.

Step 21A: In this step, I sewed the lining into the bag without the handles in place.

This particular lining fabric was so slippery, I could hardly keep it pinned in place. If you are using a cotton lining, you can sew the lining and handles at the same time. See step 22A for placement of the handles if you are sewing them with the lining.

I like to sew with the lining up because I can see exactly where it is.

Step 22A: Mark the center of the bag with pins. Then measure out to where the insides of the handles will be.

If you sewed all the way around the bag like I have shown, you have to rip open the seam to place the handles. More precise sewers would have left small openings for the handles. I’m not that precise and I love my seam ripper.

You will want to open the seam slightly wider than the width of the handles.

Step 23A: Slide the handles into the openings. Pin into place. Make sure the handles are the same length by holding them next to each other.

Sew the handles into place.

Go back to the Gusseted Bag Tutorial for hard bottom instructions.

Voila, you are done! Sit back and enjoy your bag.

Here I am!

Yes, the allergies have taken over my life. I have either been really sick with allergies (lethargy and dizziness) or I’ve had migraines. Both ways suck. If you don’t want to read about it, scroll down to the pictures of my latest project.

I just saw the ENT specialist today. He concurs that I have allergies. Heh, thanks, doc!

Actually, he was very nice and wants to screen my allergies before prescribing more, or different, drugs than I have now. The next step is 2 hours of skin pricks to see what I react to. Woohoo! Fun!

Oh, and he wants me to start saline rinses… through the nose snorting saline water rinses… I don’t think that is going to happen, and I told him as much. I may seem like an uncooperative patient but at least I’m an honest one. Why won’t it happen? Let’s just say my face is very sensitive… I’m the one that holds her nose when she jumps in the water, and I almost never put my face underwater. Why? Because I don’t like water in my nose, eyes, or ears. Cannot stand it. But, since I’m a big girl, I’m going to try to psych myself up to the saline rinses… it just isn’t going to happen overnight though.

Oh, and my new regular doctor is convinced that my endocrine system (aka hormones) is out of whack. More tests! Blood tests. Have I told you about me and blood tests? No? Let me tell you now… I don’t do well with blood tests. I have small, roly poly veins that your average phlebotomist (the person that sticks that huge needle in your arm) cannot seem to hit without digging around. I have a “one chance” policy with blood tests. If they can’t hit the vein the first time, someone else has to come in… usually the head phlebotomist. I forgot to mention this rule the last time I had a blood test. The result was that the woman missed and started digging around in my arm. I nearly passed out. See? It is bad. I know it’s psychosomatic (all in my head) but knowing doesn’t change the effect. Also, my son was with me that last time and he was terrified when I started flaking out. Doubly bad.

Anyways (oh, shut up! I wrote that for the peedants out there… like my sweet hubby who cringes when I use the bad grammar), it isn’t all bad. I have orders for bags. One of them is a new shape (new to me, is there anything truly “new” in the bag world?). I made a mock up to get a feel for the cutting and sewing requirements before I cut the fabric my client chose. It’s still not done but have a looksy:

Purse front

Purse back

I didn’t quite get the pattern right the first time (that’s why I do mock ups) so there is some gapping on either side of the flap. The handles will be attached on the sides of the purse for over the shoulder wear… this client likes a long handle. I think a long handle will look ok but a short one would look better. This fabric was kind of blah so I used fleece interfacing and sewed along the stripes to give it more texture.

I will probably put a magnetic snap on flap. I’m not sure if my client wants the flap or no flap and a zipper.

The return of chaos

Huh! It has been a while since my last post. And the break was totally unintentional, I will enumerate my excuses…

1) Turbo allergies… my allergy meds suddenly weren’t cutting it. I barely had the energy to sit up so posting wasn’t going to happen.

2) I decided that since my meds weren’t working, I would stop taking them because they make me drowsy. Ha! That was a bad, bad mistake. Two days later and I was way worse. Pseudophedrine and allergy meds to the rescue!

3) My mother came for a week long visit… enough said.

4) My son then got sick and I had one of the worst migraines since before I got pregnant. I wanted to go to the ER because my meds didn’t work (hmmm… I am seeing a theme here). Unfortunately, my son had a screamingly sore throat at the same time (try that with a migraine, I dare you!)… I couldn’t drive myself and there was no way I was getting in the car with the screaming banshee.

5) My dr disappeared. I talked to her receptionist one Monday about a referral. Come Friday I hadn’t received it yet so I called again… the number was disconnected. Monday she was still disconnected… so I said “bleep bleep bleepity bleep!”

6) I made an appointment with an ENT without the referral… because sometimes they will do that for patients whose doctors disappear into thin air. But he is a specialist, and the appointment is still in the advanced future.

7) I found another doctor but that appointment is also in the future (but not as advanced). She comes highly recommended which is good because otherwise I wouldn’t be able to see past the hefty first visit charge (she is out of network).

8) My 4-year old has been replaced with a pod boy. Oh my gawd! Send help!!!

Enough excuses. On to the things that really count… craftiness.

I made covers for this chair’s cushions (and one other matching chair). It looks crumply because I haven’t sewn the fourth side, and I think it needs more stuffing.

chair

I have two cafe chairs that needed new seat covers… hot red! Love it.

cafe chair

And I sewed up these blocks for a couch throw. Each and every block is wrong… and I double checked the pattern before I sewed them. Ding dang darn! I might resew them, but I have to put them aside so the frustration factor diminishes.

quilt blocks

I rearranged the play area. Once upon a time, this was my dining room. I pulled the shelves out of the nursery because they weren’t being used effectively. Now my son likes this area.

play area

My almost sister-in-law brought yarn spun up from her dogs’ hair. She wants me to knit up flowers with them. These skeins are all poodle hair… they turned out pretty nice.

dog hair

I’ll be around more now but I’m still having problems with my allergies (and the pod boy). Thanks for all the nice notes about my well being!!!

Gusseted Tote Bag tutorial…part 4

Where are we?

Shell, check. Liner with pockets, check. Handles, check. Good! Since we have all those pieces ready, let’s put the bag together.

I hope the elves are on duty because I’m about to tell you how to put the bag together using my least favorite method. This is the method you see in most tutorials, and it works beautifullly… so master it! Then, grasshopper, you can move onto the “Cathy is a perfectionist and the pillowcase method ruffles her feathers” method. The “CIAPATPMRHF” method is going to be another mini-tutorial at a later date.

FYI: I am making all the pictures public so you can click on them.

Step 18: Place the liner inside the shell so that the right sides of each are facing.

Attach liner to shell
The picture makes so much more sense than the words.

Step 19: Sew the top of the liner and shell together. Leave a 4-inch opening on one side.

Attach liner to shell
You could also leave openings for the handles at this step.

Step 20: Reach inside the 4-inch opening. Grab a corner of the shell and pull it through the opening. This is going to turn the bag out so that only the right sides show.

Opening logic
Shell and lining attached
It’s like magic, and you didn’t even need the elves.

Step 21: Push the liner back inside the shell.

Push lining into shell
That was a nice and easy step, probably the last easy one!

Step 22: Determine where you want to insert the handles.

Marking handle location
Placing handles
I like the handles to be about 4-5 inches apart. Measure how wide your bag is, divide that number in half… this gives you the center point (my center pin is round yellow). Put a pin in the bag to locate the center. Now locate the handle insertion points. If your handles are 4″ apart, then put a pin 2″ to the right of the center pin, and 2″ to the left of the center pin (my pins are round white). These pins locate the inside edge of the handles. Make sure you mark both sides of the bag with pins. Use a seam ripper to open up the seam where you want to place the handles… make an opening slightly wider than your handles.

Did you notice I have more pins in the bag than I said you need for the handles? Those pins are optional.

I don’t like how this method of bag construction puts the seam between the liner and the shell at the very top of the bag. I want the seam to be behind the shell so I roll the seam down just a bit to the inside of the bag… the flat flower pins are holding the seam in place. If you don’t mind the seam being on top, you don’t have to roll it down.

Step 23: Insert the handles into the openings. The handles’ seams should face the inside of the bag. Pin in place.

Placing handles
The hardest part of this step is making sure you don’t twist the handles before inserting the other side.

Step 24: Make sure all your raw edges are tucked inside for a hem. Top stitch all around the bag.

Picture for Step 24: Imagine perfect top stitching around the top of the bag…

Your bag is now 95% complete. And it is so very wrinkled… ick!!! Go, use a medium hot iron to press it. Avoid melting the ribbon, and don’t use too much heat or the fusible interfacing will remelt and pucker. That is potential disaster after all your hard work.

Sit back and admire your work!

To be continued….